First of all, to successfully follow this guide you should be familiar with the YAML serialisation language. (YAML files can be created with yaml and yml file extensions, both are the same in interpretation and syntax and I will use one or the other interchangeably).
If you have a project hosted on GitHub, there are plenty of automation tools you can rely on. If a few days ago we talked about using Dependabot on GitHub for Flutter and Dart, today I'm going to talk about using GitHub Actions as a Continuous Integration tool.


GitHub Actions and Workflows
First of all, we will go to the documentation so that we can clarify what a Workflow in GitHub Actions is.
A workflow is a configurable automated process that will run one or more jobs. Workflows are defined by a YAML file checked in to your repository and will run when triggered by an event in your repository, or they can be triggered manually, or at a defined schedule.
Workflows are defined in the .github/workflows directory in a repository, and a repository can have multiple workflows, each of which can perform a different set of tasks. For example, you can have one workflow to build and test pull requests, another workflow to deploy your application every time a release is created, and still another workflow that adds a label every time someone opens a new issue.
So we already know that we should have a hidden folder inside the repository as follows.

As you can imagine. We will create as many workflow files as we want groups of jobs to be executed.
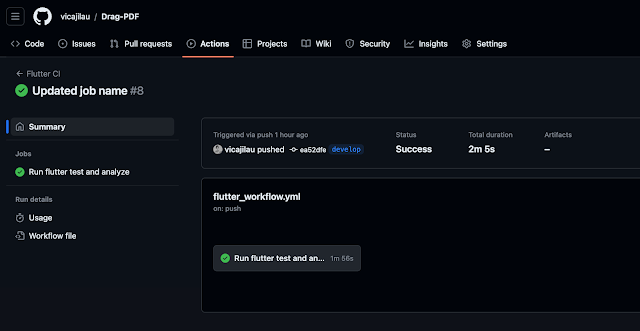
In the case of the image I only have one workflow inside a file called flutter_workflow.yml
You can create it with any name you want.
Workflows
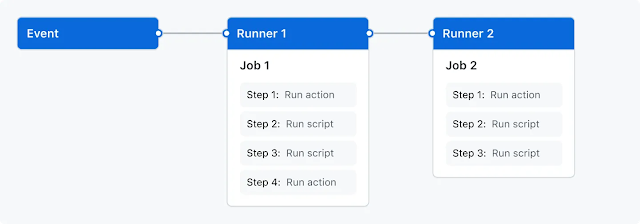
Following the documentation again, a workflow should contain the following basic components:
- One or more events that will trigger the workflow.
- One or more jobs, each of which will run on an execution machine and execute a series of one or more steps.
- Each step can execute a script that you define or execute an action, which is a reusable extension that can simplify your workflow.
Creating a workflow

In the second line, we indicate the event or events that will trigger the workflow to start running.
In my case, as you can see below, it is triggered when a push is made to the develop and master (line 3 - 6 both inclusives).
It also triggers the workflow with pull requests to the same two branches (line 7 - 10 both inclusives).
A complete list of the events that can be defined can be found at the following link. Now we can focus on writing the jobs we want to be executed. With the input jobs: (line 12) we define that it is the entry point to each of the jobs that the workflow will perform. In this example we only have one defined, but we can define as many as we want as long as we respect the yml identation.

We can give it a name by which it will be referred to on the GitHub Actions website (line 14).

As it will be run on android on an ubuntu machine, it will also require the use of the Java SDK by using the action on line 18.
Finally, we will indicate that it uses the flutter action to provide the SDK with Dart and Flutter.

The full yml file appears below or you can view it in this repository.

Conclusions
As you can see, this opens the way even to continuous distribution, as we can even create tasks that build and even publish the versions. But for that we will have to find a way to get the keystore information and the key.properties file to GitHub Actions as these should never be uploaded to the repository!
So in order not to make this guide even longer I have decided to split it into 2 parts where we will discuss how to protect API keys from being available in our Flutter repositories.
Note: If you want to know how to protect your sensitive data by removing it from the repository, take a look at our guide.
See you in the next post, greetings!
Comments
Post a Comment