As many of you already know, one facet that represents me is training other developers in the world of mobile development. At Flutter, one of the biggest questions I regularly get from other developers who are just starting out in this technology and even from those who have been around longer is about navigation. So I thought I'd write a post that I can redirect to when I'm asked again.
Named routes - Deprecated way
The little forgotten biggie. Although this type of routing can handle deep links, the behaviour is always the same and cannot be customised. What this means is that when the platform receives a new deep link, Flutter inserts a new route into the browser, regardless of where the user is at the time.
Another limitation is that on the web, Flutter also does not support the browser's forward button for applications that use named routes. For these reasons, Google discourages the use of named routes in most applications.
So for this reason, you will allow me not even to explain how it works and how it is used. I would just say that if you see something like this you should rethink the implementation of your navigation in the app.
What does Google say about routing and navigation?
Well, the Flutter documentation makes it clear that simple apps without complex deep linking or without web implementation can use Navigator. However, if this is not your case, you will need Router if you want to do more complex navigation or if you need any of the above. So from now on we will refer to Navigator as the simple version and Router as the more complex but customisable version.
Navigator
Using the appropriate transition animation for each operating system, the Navigator widget is very useful both to advance to a new screen and to go back to the previous view. All this with very little effort since, receiving the context of the view as a parameter, we can create a new view called SongScreen that receives a song as a parameter:

The MaterialPageRoute object is a subclass of Route that specifies that the type of transition we want is the one used in Material Design. There is also the possibility of using CupertinoPageRoute, this creates a native animation in iOS but remember that we will have to check the operating system before invoking it or it will cause an error.
An important fact to know is that if we go to the definition of push, we will observe that it is an asynchronous function that returns a generic type T.

What does this mean? Well, we can use it to receive data from another screen, as shown below.
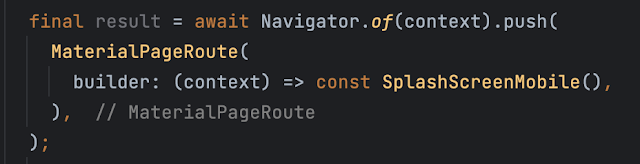
To return to a view we simply call the pop() method passing it the context as the first mandatory parameter. Additionally we can pass it a return parameter to be returned and captured in the result variable in the image above. This return parameter can be a plain variable or an array of elements.

Note of the subject
You may have seen another way to invoke push and pop from the navigator. One like the following:

Well, in practice such static methods call the above shown. That is why they are discouraged as they do not provide anything but delay in execution.


Router
As mentioned above, it is used in those applications with advanced routing, deep link or web support needs. For this, we must use the go_router dependency.
First of all we need to add the dependency in the pubspec.yaml. Then, the documentation talks about adding all the routes in a configuration. As we can see below:

It is important to note here that GoRouter is the configuration object that will contain all the routes of our application. On the other hand, GoRoute is the type of object that GoRouter expects in each array entry. In other words, our object with all the routes is GoRouter, while GoRoute is each of the routes.
Depending on the complexity of the application, we may even want to create our own routing service and create one configuration or another depending on the platform or criteria we want to use.

But, irrespective of this. To connect the GoRouter configuration with our app, we must modify the main.dart file to indicate the new routing configuration as you can see below:

In my case, as I told you, since I wanted to leave DragPDF in a scalable way, I decided to set up the service so that in the future, if we plan the desktop versions, the routing would already be ready.
How do I do the push and pop like we did in Navigator?
What go_router does is to create an extension in BuildContext so that we can call the go method inside context. As you can see below:

This is a shortcut that will be followed by the next invocation:

If you notice there is an optional parameter with the extra name. Indeed, this is where we can pass an object forward to be handled in the next view after navigation.
It is important to emphasise that we must indicate the complete path or url that we indicate in the configuration. An example would be the following:
To return to the previous view we can use the context pop method. In a similar way to the go method.

So we can go back to the previous screen using:
Wait a minute, I've seen the push function. Shouldn't we use push instead of go?
Effectively, as you can see go_router gives us the option to use push.

This type of navigation is known as Imperative Navigation. This navigation allows a screen to be added to the Navigator's history stack. The reason I have not mentioned it and the use of Imperative Navigation is discouraged is because there is a problem with the browsing history on the web platform. This issue was discovered in 2020 and is still pending. For more information, see issue #99112.
Conclusions
I hope this post has cleared up your questions about navigation and routing. I know we haven't covered the navigation bar yet, but that was on purpose, so as not to make this post bigger than it needs to be.
See you in other posts!
Comments
Post a Comment